

The fastest, most cost-effective way to prevent under sink water damage is to install a waterproof, raised-edge liner sized precisely to your cabinet. A custom-fit option like a Smartliner-usa under-sink liner contains drips, slows moisture migration into particleboard, and makes slow leaks visible before they become expensive repairs. Liners do not fix a burst pipe or a failed P-trap seal, but they give you time to catch and address small problems before the cabinet floor rots.
The single best action: Install a waterproof liner with at least a 0.5-inch raised lip, sized to your cabinet. Choose custom-fit when available. If custom is not an option, select a thick PVC or LDPE tray with a lipped edge and trim it to fit.
Quick action list:
- Measure cabinet width and depth before ordering.
- Choose a custom-fit liner (Smartliner-usa) or a thick PVC tray with a raised lip.
- Trim to fit if needed, leaving no gaps at the back or sides.
- Inspect monthly and wipe clean quarterly.
Table of Contents
- Why does under sink water damage happen, and what does a liner actually prevent?
- What should you look for when buying an under-sink liner?
- How do common liner materials compare?
- How do you measure, trim, and install an under-sink liner correctly?
- How much does an under-sink liner cost, and where do you buy one?
- How do you clean and maintain a liner, and when should you replace it?
- Key Takeaways
- The case for getting the fit right the first time
- Smartliner-usa custom-fit liners: protection that fits your cabinet exactly
- Useful sources
Why does under sink water damage happen, and what does a liner actually prevent?
Particleboard cabinet floors absorb moisture faster than most homeowners expect. A slow drip from a supply line connection or condensation on cold pipes can saturate the base of a cabinet over weeks without any visible sign. By the time you notice swelling or a musty smell, the damage is already done.
A liner acts as the first line of defense by creating a waterproof barrier between any moisture and the cabinet floor. It contains drips and condensation, limits how far water migrates laterally, and makes any pooling immediately visible so you can fix the source faster. According to Plumbing Tips Today, under-sink cabinet mats reduce moisture exposure, can prevent mold growth, and help avoid cabinet warping — and the Insurance Information Institute reports that water damage accounts for nearly 25% of homeowner insurance claims.
Key benefits at a glance:
- Reduced mold risk from trapped condensation.
- Avoided cabinet replacement costs from particleboard rot.
- Faster leak detection because pooled water is visible on the liner surface.
- Easier cleanups: wipe the liner rather than scrub a stained cabinet floor.
- Stable storage: items stored under the sink stay dry.
One important limit: a liner buys you time on minor drips. A major plumbing failure requires immediate repair. No liner substitutes for fixing the source.
Statistic: Water damage and freezing account for nearly 25% of homeowner insurance claims, making under-sink leak protection one of the highest-return preventive investments in the home.
What should you look for when buying an under-sink liner?
Fit is the most critical variable. A liner with gaps at the back wall or around pipes defeats its own purpose: water finds the gap and reaches the cabinet floor anyway.
- Eco credentials: Verify recyclability claims on the product page. Smartliner-usa uses 100% recyclable materials and lists material specs directly on product listings.
Pro Tip: When choosing between a custom-fit liner and a universal tray, go custom if your cabinet has an irregular shape, a center post, or pipes that enter from an unusual angle. Confirm precise-fit specs on the Smartliner-usa product page before adding to cart — the fit data is listed per cabinet configuration.
How do common liner materials compare?
Tray-style liners with sidewalls outperform flat sheets in containment, and material choice determines how long they last and how easy they are to maintain.
| Material | Waterproof | Cut-to-fit | Durability | Chemical resistance | Recyclable | Best use |
|---|---|---|---|---|---|---|
| PVC | Excellent | Easy | High | Good | Check label | General kitchen/bath |
| LDPE | Excellent | Easy | High | Excellent | Often yes | High-moisture cabinets |
| Silicone | Excellent | Moderate | Very high | Excellent | Varies | Long-term installs |
| Thick rubber | Excellent | Moderate | High | Good | Varies | Budget-friendly option |
| EVA foam | Poor | Easy | Low | Poor | No | Avoid for wet areas |
| Fabric/felt | None | Easy | Low | None | No | Never use under sinks |
PVC and LDPE are the most practical choices for most homeowners: easy to trim, durable, and available in custom-fit configurations. Silicone lasts longer but costs more and is harder to cut cleanly. EVA foam and any fabric-backed liner absorb moisture rather than repel it — they make the problem worse.
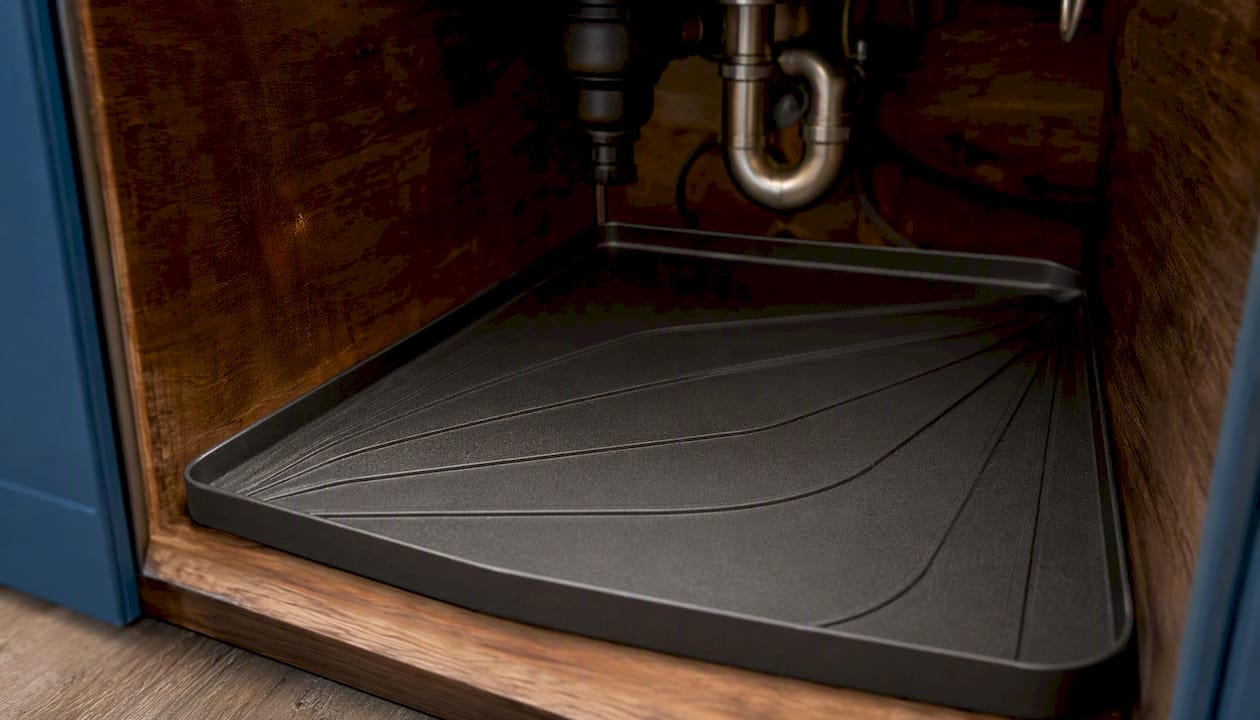
For sidewall design, an integral molded lip outperforms a folded or taped edge. Some tray designs include channeling that directs water toward a corner, which makes it easier to spot pooling during monthly checks.
How do you measure, trim, and install an under-sink liner correctly?
Start by measuring width at both the front opening and the midpoint of the cabinet, then measure full depth from the front edge to the back wall. Note every pipe location and obstruction before cutting anything.
- Empty the cabinet completely and wipe the floor dry.
- Measure width at the front and at the midpoint; record both. Measure depth to the back wall.
- Mark the liner with a permanent marker using your measurements, adding a note for each pipe location.
- For pipe cutouts, mark the hole 1/4 inch smaller than the pipe diameter so the liner hugs the supply line snugly.
- Use a sharp utility knife for PVC or LDPE; sharp scissors work for thinner rubber.
- For the slit method, cut a straight line from the liner edge to the pipe center, then cut the pipe hole. This keeps the liner in one piece and is easier to remove for cleaning.
- Place the liner flat, press it against the back wall, and confirm the lip sits flush against all sides.
- Apply a thin bead of clear silicone caulk along the back edge if there is any gap between the liner and the wall.
- Use double-sided tape under the front edge to prevent shifting.
Tools needed: tape measure, permanent marker, utility knife or sharp scissors, clear silicone caulk (optional), double-sided tape (optional).
Pro Tip: If you need frequent access to the shutoff valves or P-trap, use the slit method rather than a full cutout. The liner stays in one piece, lifts out easily for cleaning, and drops back into place without re-cutting.
Preserve plumbing access by keeping the liner removable. A liner glued permanently in place makes routine maintenance harder and can trap moisture if it ever develops a small tear.
How much does an under-sink liner cost, and where do you buy one?
Universal flat sheets and basic PVC trays typically run $10–$30. Mid-range lipped trays with sidewalls fall in the $25–$50 range. Custom-fit liners cost more depending on cabinet size and material, but the precise fit eliminates the gaps that make cheaper options fail.
Smartliner-usa sells custom-fit liners direct-to-consumer online, with material specs and fit data listed on each product page. Home centers and e-commerce marketplaces carry universal options, though sizing and lip height vary widely by product.
Buying checklist:
- Measure your cabinet before ordering anything.
- Choose a waterproof material with a raised lip of at least 0.5 inches.
- Order custom-fit when your cabinet has irregular dimensions or a center post.
- Verify recyclability and warranty terms on the product page before checkout.
How do you clean and maintain a liner, and when should you replace it?
Pull the liner out monthly, wipe it down, and check the cabinet floor underneath for any moisture. A monthly inspection catches slow drips that the liner has been containing silently. Every three months, remove the liner completely, let it air-dry, and inspect it for cracks, tears, or permanently curled edges.
Signs to replace immediately:
- Cracks or tears that break the waterproof surface.
- Lips that no longer sit flush against the cabinet wall.
- Persistent odors that do not clear after washing.
- Any visible softening or material degradation.
Custom-fit liners made from PVC or LDPE typically last several years under normal use. Check the product warranty when you buy — Smartliner-usa lists warranty and return policy details on each product page.
Pro Tip: Place a thin secondary absorbent pad directly under supply line connections where condensation is heaviest. It will show moisture faster than the liner alone and helps you pinpoint a slow drip before it pools.
Key Takeaways
A waterproof, raised-edge under-sink liner is the single most cost-effective way to prevent cabinet rot and mold from minor leaks and condensation.
| Point | Details |
|---|---|
| Raised lip is non-negotiable | Choose a liner with at least a 0.5-inch lip; flat sheets offer no meaningful containment. |
| Water damage risk is significant | Water damage accounts for nearly 25% of homeowner insurance claims, per the Insurance Information Institute. |
| Material determines performance | PVC and LDPE outperform EVA foam and fabric; silicone lasts longest but costs more. |
| Measure before you order | Measure cabinet width at two points and full depth; pipe cutouts should be 1/4 inch smaller than the pipe diameter. |
| Smartliner-usa for custom fit | Smartliner-usa offers custom-fit liners in 100% recyclable materials with precise-fit technology for a gap-free install. |
The case for getting the fit right the first time
Most under-sink liner failures come down to one thing: the liner did not fit the cabinet. A gap at the back wall, a pipe cutout that is too large, or a lip that curls away from the side panel all create paths for water to reach the wood. The liner looks like it is doing its job until you pull it out and find a stained, swollen cabinet floor underneath.
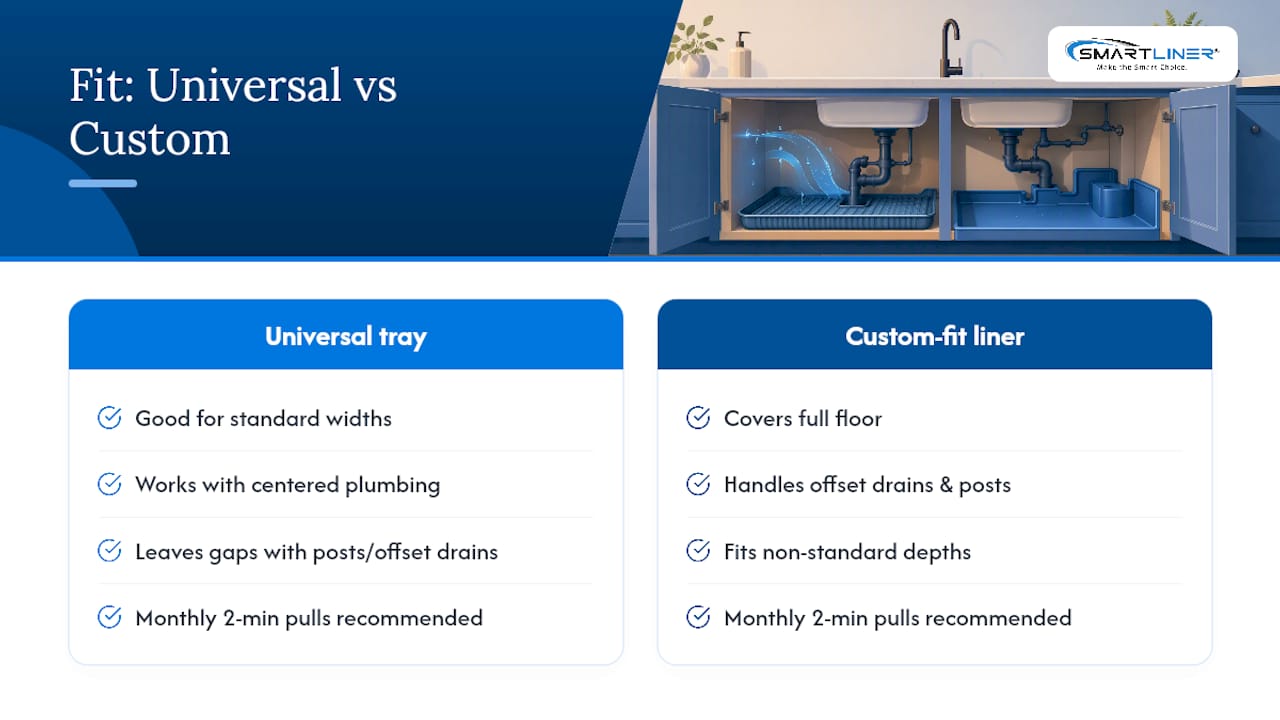
The conventional advice to “just buy a universal tray” misses this. Universal trays are fine for standard cabinet widths with centered plumbing. The moment your cabinet has a center post, an offset drain, or a non-standard depth, a universal tray leaves gaps. Custom-fit technology exists precisely because cabinets are not all the same, and a liner that does not cover the full floor is only marginally better than no liner at all.
The other underestimated factor is inspection cadence. A liner that contains a slow drip for three months without being checked is trapping moisture against the cabinet floor in a different way. Monthly pulls and a quick look underneath take two minutes and catch problems before they compound.
Smartliner-usa custom-fit liners: protection that fits your cabinet exactly
Cabinet rot from a slow kitchen sink leak costs far more to repair than a quality liner costs to buy. Smartliner-usa makes custom-fit under-sink liners from 100% recyclable materials, using precise-fit technology to match your cabinet’s exact dimensions, pipe locations, and obstructions. No trimming guesswork, no gaps at the back wall.
Ordering is straightforward: measure your cabinet width and depth, select the matching configuration on the Smartliner-usa website, and confirm the fit specs on the product page before checkout. Warranty and return policy details are listed on each product listing so you know what you are covered for before the liner ships. If you have questions about fit or material options, Smartliner-usa’s customer service team can help you confirm the right choice for your cabinet.
Useful sources
- Sink Bathroom Cabinet Mats For Plumbing From The Floor - Plumbing Tips Today
- Xtreme Under Sink Mat for Water Damage Prevention - Woodworker Express Blog
- Waterproof Mat Placement Under Kitchen Sink Made Simple
- How to Install an Under Sink Rubber Mat | Killarney Metals
- SMARTLINER USA Official Website | Custom Fit Floor Mats Cargo Liners